How to create your own augmented reality filter on Instagram

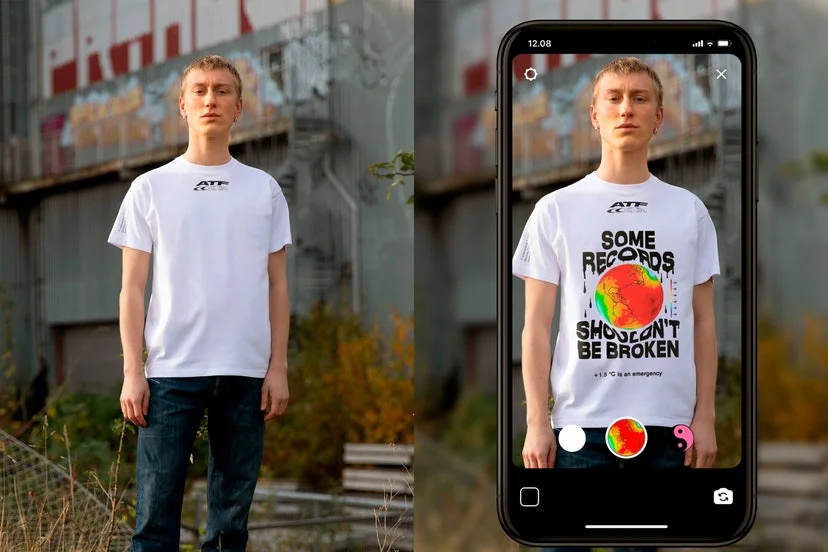
Augmented reality has already reached the filters of Instagram stories. Do you want to create yours? We tell you everything here.
Instagram filters are very popular and often make normal photos look great. You can add different colors and effects, both in photos and in videos and boomerangs .
But now filters have taken a big step forward in innovation and possibilities. Augmented reality on Instagram is used a lot and here you will find some incredible tips so that you can be aware of everything you need to know.
Don’t know what to post in your stories?
No matter where you are, if you have blemishes on your face or if you just don’t want to comb your hair, these effects are a great option to upload content to your stories without complications.
To use the filters of Instagram stories and augmented reality you have two options. The first is to use pre-designed filters from the app or from the people who created your custom filters. You just have to follow those who publish or have published augmented reality content on Instagram and select the effect you want. Once selected you can simply test the effect or save it within yours to be able to use it at any time.
The other way, much more fun and original, is to create your own augmented reality filters for Instagram. As it is a longer process, we will detail below the steps to follow to achieve good results.
How to create your own filter
The first thing you should do is install the Spark AR Studio application. The only requirement that you must meet to be able to install it is to have a Facebook account. However, you should not only install it on your mobile phone, but also on a computer, since the magic will happen from there.
Once the application is installed, we can proceed to create our original and wonderful augmented reality filter. This means that we will design a project in 3D. You can opt for the application’s tutorials and easy and automatic options to create your own filter without much difficulty, although they will not be innovative and original enough as if you were encouraged to do it from scratch.
To create your filter for Facebook and Instagram stories you must take into account something basic: in the upper right corner of the screen, there is a cube. This cube serves to guide you in relation to the arrangement you prefer to place elements in the image. For example, if you want to place a background, you must select the back of the cube, while if you want to place makeup or glasses, you must select the front. Remember that you are working in 3D.
The next thing you should know is that there is a function that allows you to modify the way the video or photo is played on the device. These options are in the top window of your image preview.
Now we are ready to create. You can place a wide variety of 3D objects, texts, lights and various effects in the image by just selecting the button in the upper left corner called Insert . It is even possible to download 3D objects from the Art Library button .
Once you have designed your wonderful effect, you can save it and it will be available in your account so that you can access it from your mobile. However, it is very important to save it in the correct format, so before doing so you must select your device on the button that says Device Type and, if you cannot find it in the options, add its screen size.
You are ready to be the best of your friends with augmented reality on Instagram Stories!
If you want to discover more tricks about Instagram, we will teach you how to view stories without them knowing , to download videos from this app or to delete your account .


